How do I install and configure my Sagem 3464 modem
What do I find in my box
 |
 |
 |
 |
| Power supply | Network Cable | Telephone cable | Modem Sagem F@st 3464 |
Connect the router to my computer
- Connect the power supply to the router [PWR]
- Connect the telephone cable to the wall socket [xDSL]
- Connect one side of the network cable to the computer and the other side to the router [LAN1]

Back of Sagem F@st 3464
Power on the router
Power on the router by pushing the Standby icon.gif-button at the backside. After a selftest (Modem can reboot several times during first use. This process can take several minutes) the router is ready to configure.
How do I determine the status of my router?
| xDSL - Green |
|---|
|
On: The router is synchronized. |
| @ - Green |
|---|
|
On: The router is connected to the internet. |
| Phone - Green |
|---|
|
On: The VOIP service is configured properly and active in the router. |
| Data - Green |
|---|
|
On: The router is sending/receiving data (Internet or/and local network). |
| Wifi - Green |
|---|
|
On: WiFi is enabled in the router. |
| ETH1-ETH4 - Green |
|---|
|
On: Network cable is connected to the port and to the management computer, computer is switched on. |
Configuring your computer
- Click on 'Start' (Windows logo) > 'Control Panel' > 'Network and Internet'.
- Go to 'Network and Sharing Center' > 'Change adapter settings'
- Doubleclick on Local Area Connection to open the LAN-status window.
- Click on the 'Properties' button.
- At this point we advise you to check if there is a networkcard mentioned in the non-active textfield 'Connect using'. If not, please contact your network administrator.
- Select 'Internetprotocol version 4 (TCP/IPv4)' or v6, if it's active.
- If the 'Internetprotocol (TCP/IPv4)' is not visible in the list, please contact your network administrator.
- Click on the 'Properties' button. Write down the current settings to reconfigure/restore them again if needed.
- Select 'Obtain an IP address automatically'.
- Select 'Obtain DNS server address automatically'.
- Click 'OK' to exit the window and return to 'Local Area Connection properties'.
- Click 'OK' to exit the window and return to 'Network connections'.
How to access my router/modem
To get on the interface of your modem, launch your web browser and enter "192.168.1.1" as the website address in the addressfield. By default there is no password needed to access the interface.
If a password is required, use the serial number of your modem. You can find it at the back or the bottom of the device.

Modem configuration
Quick start is the first page you see when you access your Sagem for the first time.
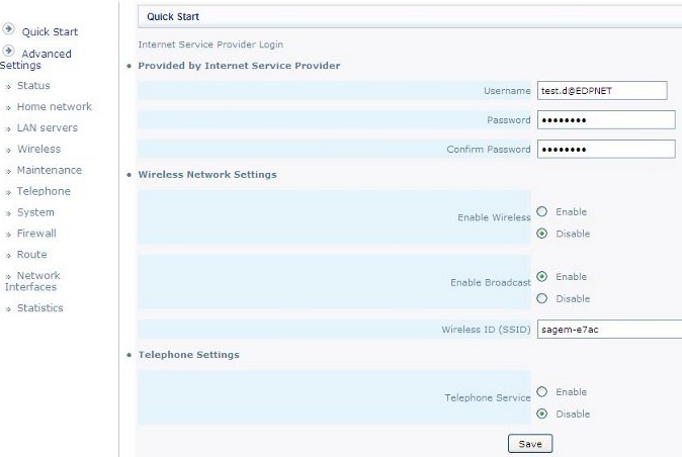
Provided by Internet Service Provider:
Username: Fill in your username for your xDSL connection.
Password: Fill in your password for xDSL connection.
Confirm Password: Retype your password for xDSL connection.
Wireless Network Settings:
Enable Wireless: You can choose to enable or to disable a wireless network.
Attention: by default the wireless is active in the router!
Enable Broadcast: You can choose to diffuse (Enable) or to hide (Disable) the name of your wireless network.
Wireless ID (SSID): Here you can define the name for your wireless network.
Telephone Settings:
Telephone Service: You can enable or disable the VOIP service.
Important: We advise you to not enable it on this page, but to follow the configuration steps below.
Status
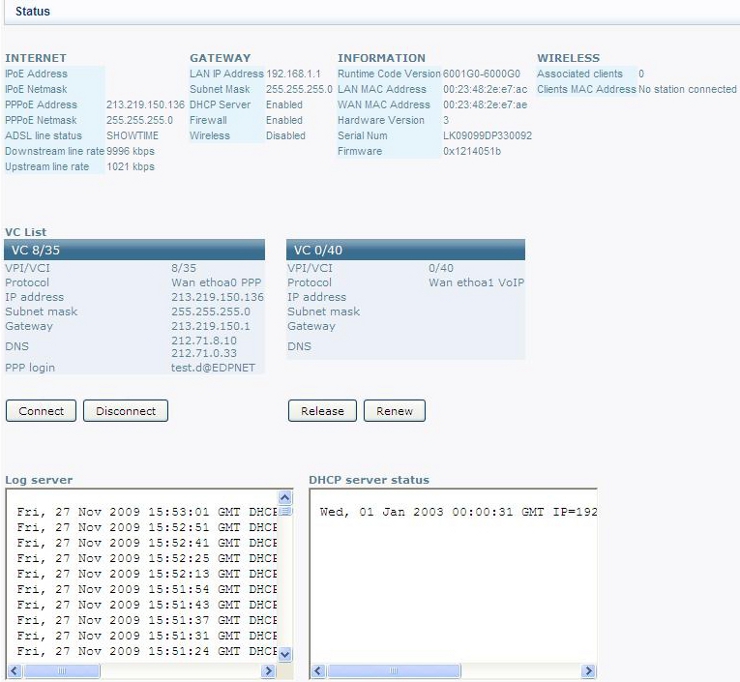
As soon as you save the settings on the page Quick Start, you will be forwarded to the page Status. Next time when you connect to your router's interface, you will be also forwarded to this page. Here you will find your IP address, data rate, login used, etc...
Wireless
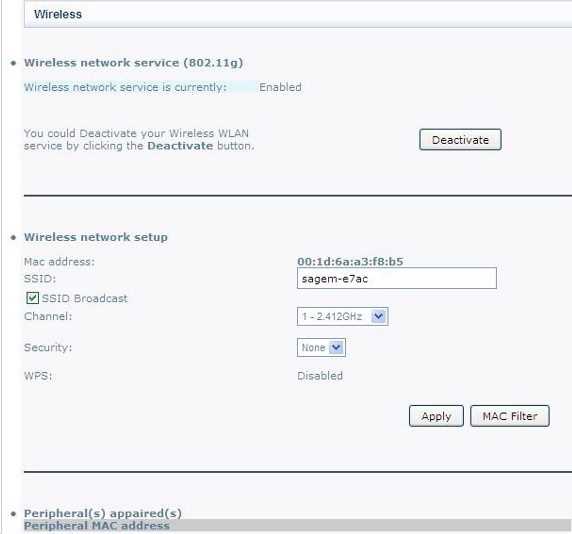
Via this page, you can decide to enable or to disable wireless on your modem.
SSID: You can change the name of your wireless network.
SSID broadcast: If you wish to keep your WIFI network hidden u can disable this function.
Channel: Here you can change the Channel (frequency).
Security: You can enable security for your wireless. You can choose between WEP (64 or 128 bits) or WPA security key.
We strongly recommend you to choose at least WPA.
Statistics
This page allows you to check the synchronization of your line, as well as the attenuation and the noise margin (for ADSL or VDSL).
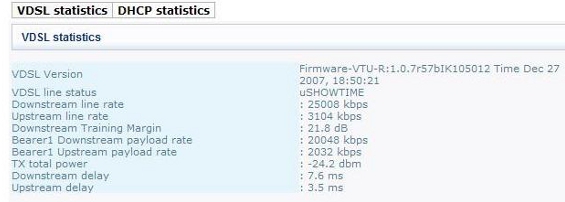
On this page you can see the synchronization values of a VDSL-connection.
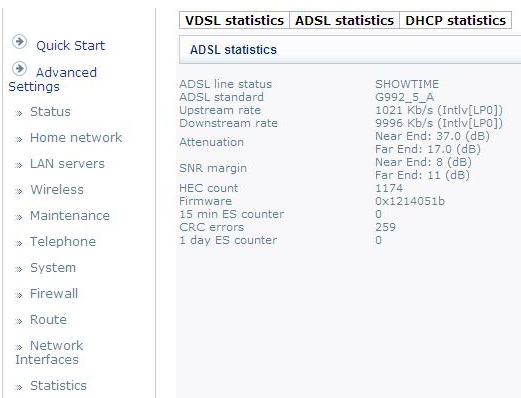
On this page you can see the synchronization values of a ADSL-connection.
Configuring edpnet VOIP telephony
To configure your VOIP account, follow the next steps:
Step 1
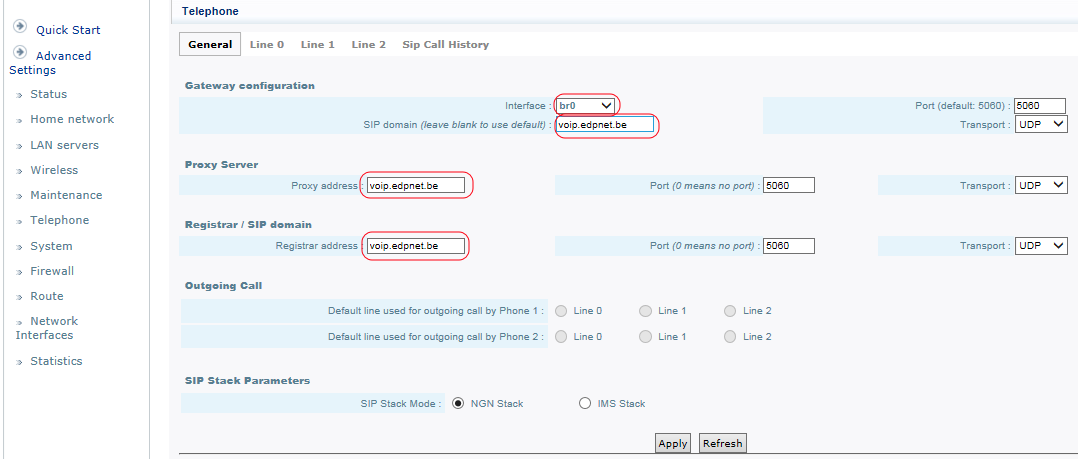
Click on Telephone in Advanced Settings. There you will find the following data:
At the top, followings menus: General - Line 0 - Line 1 - Line 2 - SIP call History.General: this page allows you to configure your SIP account. You can configure only one SIP account.
Line 0 - Line 1 - Line 2: You can fill in here the information provided by your SIP provider (telephone number, username, password). You will find more settings in Step 5.
SIP call History: Here you can see statistics of incoming/outgoing calls from your SIP account.
On the page General you can specify the name of SIP server or its IP address. You can also change a port, if needed. Here you will need to fill in sip.edpnet.be or voip.edpnet.be for SIP domain, Proxy address and Registrar address.
Settings for edpnet Telephony:
Interface: BR0
Protocol: SIP
SIP Local Port: 5060
SIP Server:
Server Address: sip.edpnet.be or voip.edpnet.be
Server Port: 5060
REGISTER Server:
Server Address: sip.edpnet.be or voip.edpnet.be
Server Port: 5060
Outbound Proxy:
Server Address: sip.edpnet.be or voip.edpnet.be
Server Port: 5060
As soon as the data is filled in, click on Apply.
Step 2
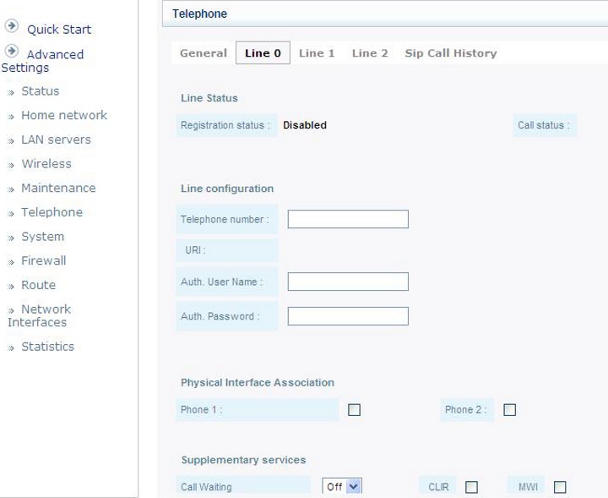
Line Status: Here you can see the status of your SIP account (Registration Status):
The status can be: Disabled, Registering, Up or Error.
Line Configuration: Here you can configure your telephone number, your username and your password. This data is provided by your SIP provider. With edpnet, phone number and username are usually the same.
Be careful: It is very important to fill in the Telephone number, otherwise the SIP account will not be activated.
Physical Interface Association: Here you can specify which VOIP port should be used for your account. You can choose Phone 1 or Phone 2 only, or enable both.
That means if you connect your telephone to the active port at the backside of your modem, you will be able to use it for receiving/making calls, depending on your SIP provider. We advise you to enable both ports.
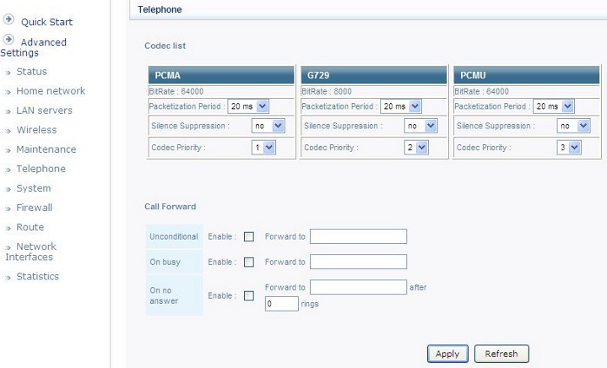
At this part of the screen, you can see different codes supported by your router (Codec List), and you can decide about their order of priority(Codec priority). You can also configure the call forwarding: to forward all the calls (unconditional), to forward the calls if the line is busy, or to forward the calls if you don't answer.
These options are mandatory and don't have to be adjusted for standard use.


